This article will guide you through the process of setting up an Enterprise level Outlook Calendar integration with SpacetoCo.
IMPORTANT:
✋This feature is for PartnerPro Hosts only and comes with additional costs. See more here: spacetoco.com/features-and-pricing/pricing-breakdown
How does it work?
SpacetoCo's Outlook integration allows you to sync 3 months of past, and 24 months of future SpacetoCo bookings with your Microsoft Outlook resource calendars.
Think of this process as setting up a ‘Super Bookings Officer Robot’, that will create Microsoft Outlook calendar events on behalf of the SpacetoCo guest, setting the location of the event at the room, allowing it to add a block-out to its resource calendar. At the same time, it reads any other events in the resource calendar and creates manual bookings over in SpacetoCo to block customers from making double bookings.
IMPORTANT:
✋ If you do not have an enterprise Outlook/Office 365 environment that is set up with resources and rooms, it is recommended to follow the Personal guide.
What data does it sync?
We include the following information:
- Booking type (Casual, Regular, Manual)
- Date & time
- Space & location
- Bump in/out time*
- Booking ID*
- Name of booking/Guest Name*
- Guest Phone number*
- Booking reason*
*These are not publicly visible from the resources calendar.
Step 0 - Open a Incognito Window
We recommend following this guide in a incognito window as to prevent accidentally linking your personal outlook account to SpacetoCo.
Step 1 - Create/Login to Non-Personal Outlook Account
It is important to link a non-personal account to your SpacetoCo account, this will ensure that the calendars and integration stay permanent and unaffected by staff changes.
A nonpersonal account may look like bookings@cityoffastbookings.gov.au or spacetoco@cityoffastbookings.gov.au
⚠️ Deleting the linked account will cause the bookings to be deleted in SpacetoCo, and potentially the loss of the shared calendar.
Step 2 - Create an Outlook Calendar
Make a personal calendar for the nonpersonal account, this is where all the SpacetoCo bookings will be written to.
Warning: If setting up multiple Host accounts with the same Outlook account, you'll need to create a separate calendar per Host account.
Creating a Calendar
-
On the side menu, click “Add Calendar“.
-
Select the “Create Blank Calendar“ on the left panel.
-
Type in the Calendar Name. We recommend something like “SpacetoCo Bookings“
-
Choose a calendar colour/icons
-
Click the Save button
-
Done!
Sharing a Calendar (optional)
The events created in this calendar will have a bunch of booking details that might be useful to someone like a booking manager. You may want to share this calendar with them so they can have easy access to it, be careful who you decide as they will be able to access customer information.
-
On the side menu, click three vertical dots next to the calendar you wish to share.
-
Click “Sharing and Permissions“ from the pop-up menu.
-
Enter the email address of the user you wish to share the calendar with, select the correct user.
-
Change the sharing permission to “Can Edit“
-
Click the Share button.
-
Done!
Step 3 - Link Outlook/365 Account with SpacetoCo
Go to https://app.spacetoco.com/dashboard/host/integrations/outlook
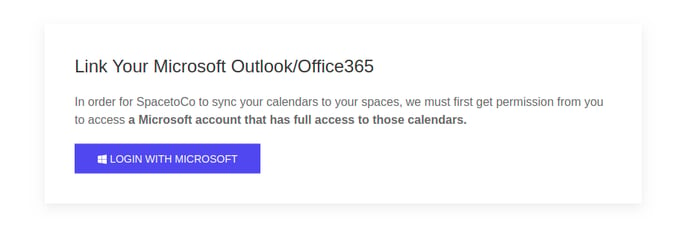
Click on the “Login With Microsoft“ button to be taken to the Single-Sign in flow with outlook.
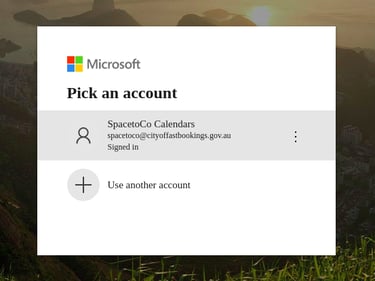
Select the account you wish to link, making sure it is the non-personal account we had set up back in step 1.
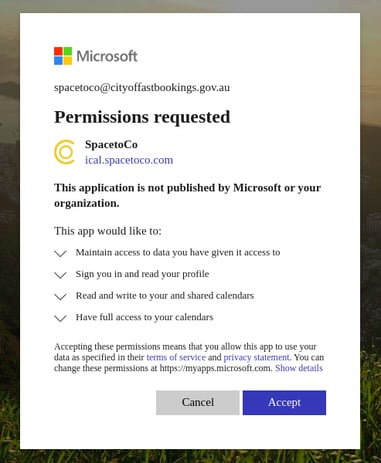
Review the permission grant request and click “Accept“.
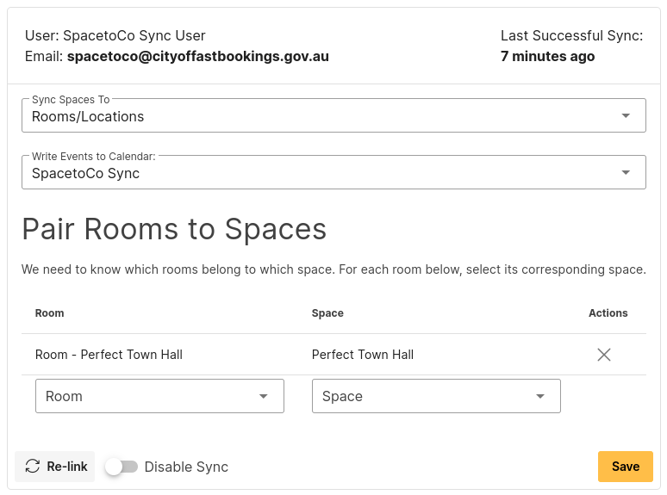
Step 4 - Pair Rooms with Spaces
After completing the sign-in, you should be presented with a pairing table.
-
Make sure the “Sync Spaces To“ option is set to “Rooms/Locations“
-
Set the “Write Events to Calendar“ option is set to the calendar you created in step 2.
-
Using the drop-downs at the bottom, find the outlook room/location/resource and select the SpacetoCo space you wish to link to it.
-
Repeat for other room-space pairs that you’ve created.
- When ready to start syncing, make sure "Disable Sync" is off.
-
Once done, click Save.
You can always come back to this page by going to https://app.spacetoco.com/dashboard/host/integrations/outlook
Step 5 - Make a Cup of Tea
The calendar will be synced once every 10 minutes from SpacetoCo's side. Please allow up to 30 minutes to see the synchronisation occur.
It's not syncing?
Some common issues that can occur are:
- The Outlook Account needs to be added as a booking delegate of each resource calendar
How to edit resource delegates - You may need to elevate delegate permissions in the exchange admin centre to "read and manage"
- If you've recently added a new space to the sync and it has stopped working, it is likely one of the two issues above.
If the sync continues not to run, feel free to reach out to customer support for further assistance.
Advanced Room Configuration
If you want event names to be added to the room calendar, or want the SpacetoCo account to be able to bypass requesting approval (if approval is enabled), it is possible to do so via PowerShell commands.
We have a separate guide for doing this here, these actions will need to be performed by an IT administrator who knows what they're doing.